Histograms to the rescue in Ember Strike
Today we will take a look at a slightly different genre. Ember Strike is one of those matching puzzle games. What makes it interesting from botting point of view is presence of PvP and shared board. Players are making moves in real time, so speed is the key! Our goal for today is to create a bot to automate puzzle matching part of the gameplay.
Acquiring the game state
We will be using image analysis to discover puzzles layout. Here is a sample board:
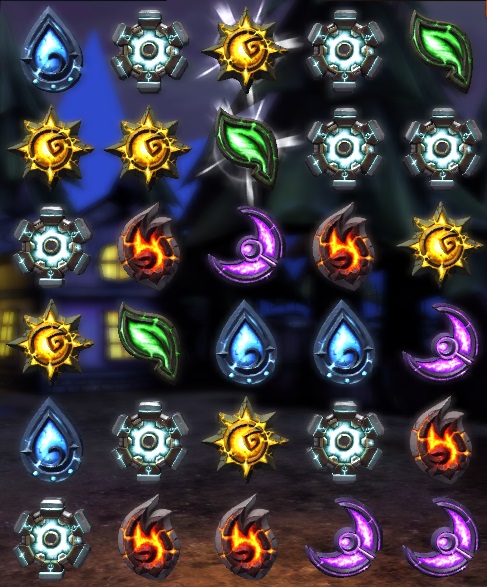
Conveniently, each puzzle type has rather distinctive color. The problem is that puzzles are animated so techniques used in previous posts (image/pixel search) are harder to apply here. Fortunately there is another tool for this job...
Histogram
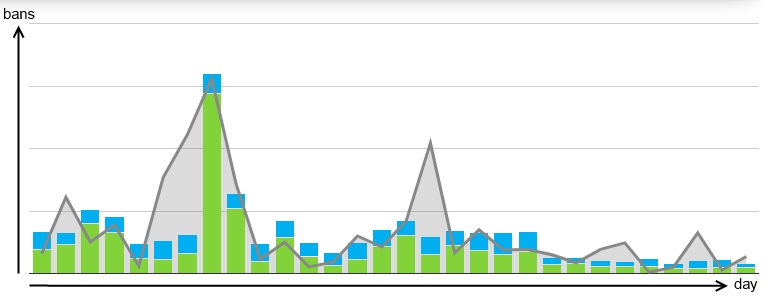
Sounds complicated, but in fact histogram is just a distribution of values matching some criteria. Like this distribution of VAC bans per day in CS:GO in a single month (in this case criteria is that a ban happened within a given day).
Check out wikipedia if you are interested in more "scientific" description. In our case we want to identify color of each puzzle.
How to use it
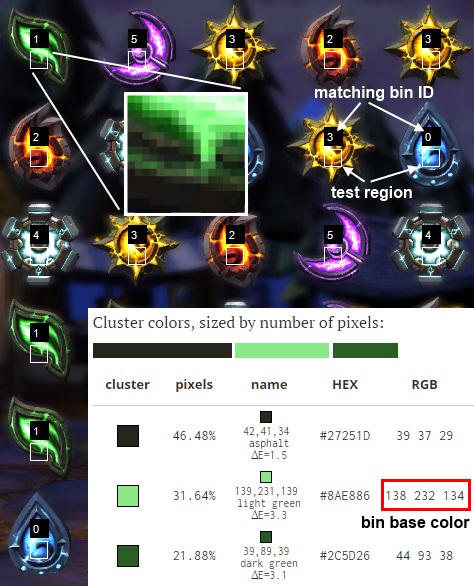
What we are going to do is to create 6 color bins (1 for each puzzle color), grab a rectangle on a screen containing given puzzle element and generate a histogram from its pixels, so we can measure how many pixels fall into each bin. By selecting most populated bin we will determine color of a puzzle.
Every bin is described by color and match tolerance (how far away given color can be from bin's color to fall into this bin). We need a way to measure distance between 2 colors (RGB). Easiest way is by using following formula (more on colors distance matter can be found here):

Key to the success is finding what colors should we use for bin definitions. It's hard for human to identify "average" color so we will use some help. There is an online tool for image color analysis Image Color Summarizer which we will utilize to identify base colors for each puzzle. We need to establish small test regions for puzzles (white squares on the image below), to generate histograms from, save region for each puzzle type to image file and analyze it using online tool.
Implementation
Histograms are really simple to implement. Let's start with a bin class.
public class ColorBin
{
    public ColorBin(UInt32 id, Color c, double tolerance)
    {
        Id = id;
        Color = c;
        Tolerance = tolerance;
        Count = 0;
    }

    public bool TryToClassify(Color c)
    {
        double distance = Math.Sqrt((double)(c.R - Color.R) * (c.R - Color.R) +
                                    (double)(c.G - Color.G) * (c.G - Color.G) +
                                    (double)(c.B - Color.B) * (c.B - Color.B));

        if (distance <= Tolerance)
        {
            ++Count;
            return true;
        }

        return false;
    }

    public void ResetCount()
    {
        Count = 0;
    }

    public UInt32 Id { get; private set; }
    public Color Color { get; private set; }
    public UInt32 Count { get; private set; }
    public double Tolerance { get; private set; }
}
Here is histogram class itself (I removed internal ColorBin class definition for clarity).
public class Histogram
{
    public Histogram()
    {
        Bins = new List<ColorBin>();
    }

    public void AddBin(ColorBin bin)
    {
        Bins.Add(bin);
    }

    public void Generate(Bitmap bmp, int left, int top, int right, int bottom)
    {
        Reset();

        for (Int32 y = top; y <= bottom; ++y)
        {
            for (Int32 x = left; x <= right; ++x)
            {
                Classify(bmp.GetPixel(x, y));
            }
        }
    }

    public ColorBin GetHighestBin()
    {
        UInt32 max = 0;
        ColorBin maxBin = null;

        foreach (ColorBin bin in Bins)
        {
            if (bin.Count > max)
            {
                max = bin.Count;
                maxBin = bin;
            }
        }

        return maxBin;
    }

    private void Reset()
    {
        foreach(ColorBin bin in Bins)
        {
            bin.ResetCount();
        }
    }

    private void Classify(Color c)
    {
        foreach (ColorBin bin in Bins)
        {
            bin.TryToClassify(c);
        }
    }

    public List<ColorBin> Bins { get; private set; }
}
Having that figured out, we can customize histogram for puzzles' color detection.
Histogram hist = new Histogram();
hist.AddBin(new Histogram.ColorBin(0, Color.FromArgb(135, 229, 253), 40)); // blue
hist.AddBin(new Histogram.ColorBin(1, Color.FromArgb(138, 232, 134), 40)); // green
hist.AddBin(new Histogram.ColorBin(2, Color.FromArgb(209,  55,  34), 40)); // red
hist.AddBin(new Histogram.ColorBin(3, Color.FromArgb(255, 247, 102), 40)); // yellow
hist.AddBin(new Histogram.ColorBin(4, Color.FromArgb(220, 246, 250), 40)); // turquoise
hist.AddBin(new Histogram.ColorBin(5, Color.FromArgb(206,  92, 240), 40)); // pink
I used pretty high tolerance, because of huge spectrum of shades and since we are using an average color we need to capture many shades on an actual sample. All is left to do is capture data...
public const int ROWS_NUM = 6;
public const int COLS_NUM = 5;
public const int HEROES_NUM = 5;

public static int[,] Data = new int[ROWS_NUM, COLS_NUM];

...

using (Bitmap bmp = AutoIt.CaptureWindow(Tools.HWND))
{
    for (int row = 0; row < 6; ++row)
    {
        for (int col = 0; col < 5; ++col)
        {
            hist.Generate(bmp, FIRST_PATCH_LEFT_TOP.X + col * HORIZONTAL_OFFSET,
                               FIRST_PATCH_LEFT_TOP.Y + row * VERTICAL_OFFSET,
                               FIRST_PATCH_LEFT_TOP.X + col * HORIZONTAL_OFFSET + TEST_SIZE,
                               FIRST_PATCH_LEFT_TOP.Y + row * VERTICAL_OFFSET + TEST_SIZE);

            Histogram.ColorBin highestBin = hist.GetHighestBin();
            Data[row, col] = (highestBin == null ? -1 : (int)highestBin.Id);
        }
    }
}
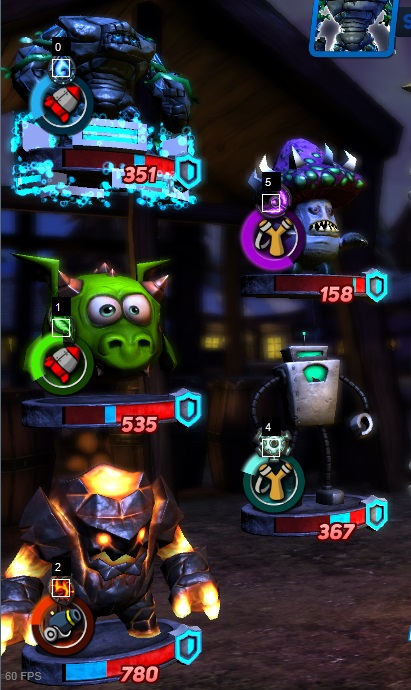
Using the same histogram we can figure out which puzzles are required to "feed" our heroes (in order for hero to perform an attack we must collect sufficient amount of matching puzzles).
Now as we have all necessary game state, we can proceed to decision making phase.
A little bit of "AI"
What we need to do is to implement an algorithm for finding best moves given what elements we need the most. I won't go too much into details here. First we have to find all possible moves. So we have board state stored in two dimensional array. What I'm going to do is go through every element, starting from top-left one and use simple "search" tree to figure out if there is a match starting at this element.
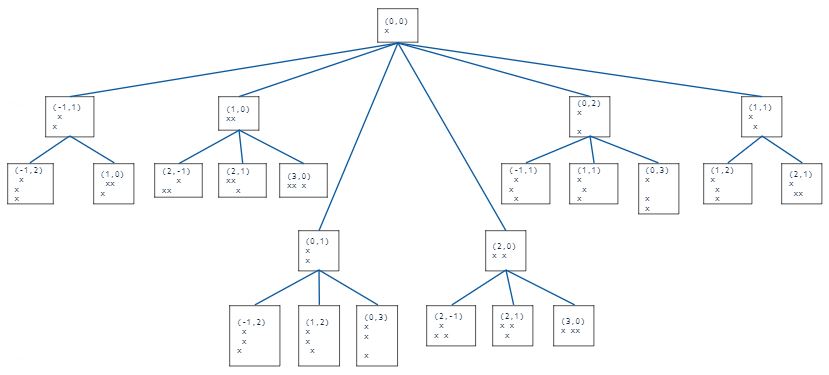
Values in parenthesis describe relative coordinates to check for presence of value x (x is initialized with whatever value there is in an array at position where we start this tree search). I store this tree in data file. It looks like this:
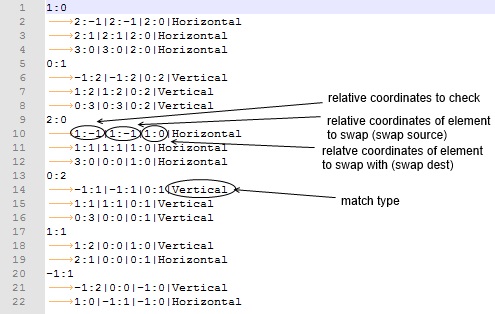
With a little trickery we can use this single tree to find matches of any length (assuming that only 1 piece can be out of place). The trick is that as long as we have match origin ([0,0]) and match type (vertical/horizontal) we can track how many matching values there are in line if we make a swap.
int EvaluateQuantity(Point origin, Point swapSource, Point swapDest, int value, int[,] data, EOrientation orientation, ref Point start, ref Point end)
{
    int quantity = 0;

    if (origin.Equals(swapSource))
    {
        origin = new Point(swapDest.X, swapDest.Y);
    }

    if (orientation == EOrientation.Vertical)
    {
        // do not add 1 when we will be performing horizontal swap
        quantity = Math.Abs(swapDest.Y - origin.Y) + (swapSource.X == swapDest.X ? 0 : 1);

        int yStart;
        int yEnd;

        // find out how many matching values there are before origin
        for (yStart = Math.Min(origin.Y, swapDest.Y) - 1; yStart >= 0 && data[yStart, origin.X] == value; --yStart)
        {
            ++quantity;
        }
        // find out how many matching values there are after swap destination
        for (yEnd = Math.Max(origin.Y, swapDest.Y) + 1; yEnd < data.GetLength(0) && data[yEnd, origin.X] == value; ++yEnd)
        {
            ++quantity;
        }

        start = new Point(origin.X, yStart + 1); // need to add 1 because it was decreased when loop condition failed
        end = new Point(origin.X, yEnd - 1); // need to add 1 because it was increased when loop condition failed
    }
    else if (orientation == EOrientation.Horizontal)
    {
        quantity = Math.Abs(swapDest.X - origin.X) + (swapSource.Y == swapDest.Y ? 0 : 1);

        int xStart;
        int xEnd;

        for (xStart = Math.Min(origin.X, swapDest.X) - 1; xStart >= 0 && data[origin.Y, xStart] == value; --xStart)
        {
            ++quantity;
        }
        for (xEnd = Math.Max(origin.X, swapDest.X) + 1; xEnd < data.GetLength(1) && data[origin.Y, xEnd] == value; ++xEnd)
        {
            ++quantity;
        }

        start = new Point(xStart + 1, origin.Y);
        end = new Point(xEnd - 1, origin.Y);
    }

    return quantity;
}
And that's about it. Here is bot in action. Since I didn't handle attacks I've added an option to toggle it on/off by pressing space, so I can perform an attack manually.
If you have any thoughts or questions, please leave a comment here or on the Facebook group.
As usual full source code is available for patrons on https://www.patreon.com/bottersgonnabot