
Automating skill checks in Dead by Daylight (Part II)
Today we will continue on the road to godly skill checks. Make sure you have familiarized yourself with Automating skill checks in Dead by Daylight (Part I) before continuing.
Preparations
In order to keep my sanity, save some time and be able to test my code in controlled environment I've decided to create a simple test application simulating Dead by Daylight skill checks.
Approach
Last time we have identified a few issues when it comes to perfect timing skill checks. Let's take a look at game and bot timelines so we can better understand the problem.
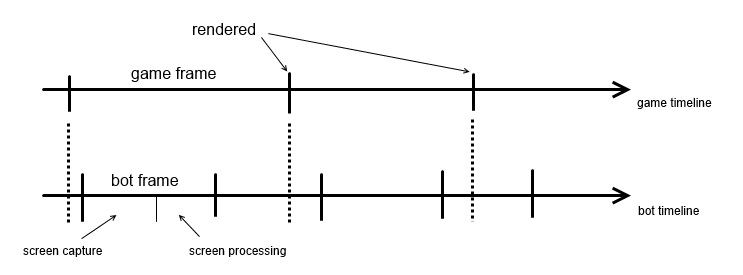
Top axis contains game timeline. Assuming we are running the game @60 fps, single game frame takes ~16 ms. At the end of each frame, new "render" frame is being presented for us. Bottom axis contains our bot timeline. Each bot frame consists of screen capture and screen processing. Depending on method used for taking screenshots (explained later on) screen capture duration will vary between 4 and 35 ms. Processing will vary as well between 0 and 12 ms. All values will be affected by overall system performance, so let's treat them as an example. Game and bot are running simultaneously, dotted lines show when new screen is available relative to bot timeline.
As you can see, there usually will be a delay between when new game frame is rendered and when bot is capturing it. This delay is hard to measure as we are not synchronized with the game. It however can be minimized by making sure that bot frame is as short as possible. Worst case scenario is when we capture screen just before new one is rendered, so it will take us whole bot frame duration to get a new one.
Another problem is that we may need to press space (to hit perfect zone) anytime during the bot frame. We are gonna do 2 things to solve this. First we need to know what is latest known progress position and how much time has passed since it changed. This is necessary, as we may have multiple bot frames during single game frame and in every single one of them progress will be at the same position. Second thing is separate thread which will extrapolate progress position based on its latest known position, time since that position was updated and approximated turn speed.
static void SpacerProc()
{
    while (true)
    {
        AutoIt.Sleep(2);

        float estimatedProgressPos = GetEstimatedProgressPos();

        if (PerfectZonePos != -1 && LastProgressPos != -1)
        {
            if (estimatedProgressPos >= PerfectZonePos)
            {
                AutoIt.SendKey(Tools.HWND, Input.VirtualKeyCode.SPACE, 50);
                AutoIt.Sleep(600);
            }
        }
    }
}

public static float GetEstimatedProgressPos()
{
    ProgressDataLock.EnterReadLock();
    float estimatedTimeSinceLastProgressChange = LastProgressTimer.ElapsedMilliseconds + LastProgressCorrection;
    float value = LastProgressPos + PROGRESS_SPEED * estimatedTimeSinceLastProgressChange;
    ProgressDataLock.ExitReadLock();
    return value;
}
Now, as we have 2 threads using progress data simultaneously, we need to use simple synchronization mechanism so sh$* won't explode.
You probably noticed that I'm applying correction in addition to time since last progress change. This is a key to the success. As soon as we start grabbing game screenshot, timer is started. This timer will measure how long it took us to capture and process this screenshot. Timer value at the end of the bot frame, in which progress has changed, will be used as a correction (plus some extra time).
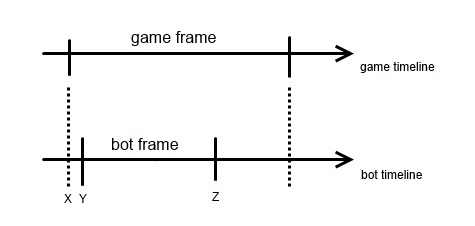
Here comes an example. Game frame was rendered at time X (we don't know exact value of X) showing progress at position P. Our bot started capturing screenshot at time Y (we know exact value of Y) and finished processing it at time Z (we know this as well), so currently skill check progress is approximately at P + (Z - X) * PROGRESS_SPEED. The problem is that we don't know value of X, so we can at least approximate it by using Y instead of X. What we know is the best and worst case scenario for Y - X value. It's anything between 0 and an average bot frame duration. I could keep track of that but I'm lazy enough to use constant (yet adjustable) value. It will also account for whatever delay there may be between sending input to the game and time when it is actually processed and skill check is stopped.
This is some pseudo code of how it looks when put all of the pieces together.
while (true)
{
    Thread spacer_thread = new Thread(SpacerProc);
    spacer_thread.Start();

    Stopwatch processing_timer = new Stopwatch();

    while (true)
    {
        processing_timer.Restart();

        // capture game window

        bool progress_updated = false;
        int progress_pos = LastProgressPos;
        SkillCheckActive = false;

        if (skill check is on screen)
        {
            SkillCheckActive = true;

            // figure out skill check position on screen

            // find progress position and store it in ProgressPos

            if (ProgressPos > progress_pos)
            {
                progress_updated = true;
                progress_pos = ProgressPos;
            }

            // find perfect zone position and store it in PerfectZonePos
        }

        if (!SkillCheckActive)
        {
            // reset skill check state data
        }

        if (progress_updated)
        {
            ProgressDataLock.EnterWriteLock();
            LastProgressPos = last_progress_pos;
            LastProgressTimer.Restart();
            LastProgressCorrection = processing_timer.ElapsedMilliseconds + FIXED_CORRECTION;
            ProgressDataLock.ExitWriteLock();
        }
    }
}
Overall conclusion is the shorter bot frame is the better, so we need to do some optimizations.
Optimizing screen capture
Capturing screenshots at high frequency is a challenge, especially when you want to create a universal solution, compatible with any modern Windows system. I definitely didn't want to go that far. I have explored some areas and want to share my results. All presented times were taken on Windows 7 using my test application. They will vary a little when it comes to an actual game but overall relative performance remains unchanged.
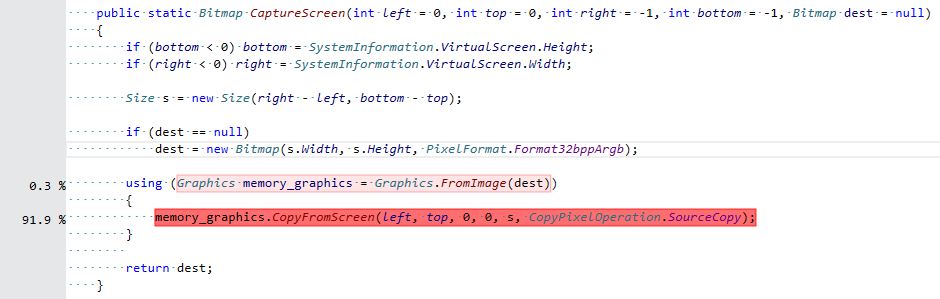
Naive C# screen capture (~40 ms - varies 32-61 ms)
Bitmap CaptureScreen(int left = 0, int top = 0, int right = -1, int bottom = -1, Bitmap dest = null)
{
    if (bottom < 0) bottom = SystemInformation.VirtualScreen.Height;
    if (right < 0) right = SystemInformation.VirtualScreen.Width;

    Size s = new Size(right - left, bottom - top);

    if (dest == null)
        dest = new Bitmap(s.Width, s.Height, PixelFormat.Format32bppArgb);

    using (Graphics memory_graphics = Graphics.FromImage(dest))
    {
        memory_graphics.CopyFromScreen(left, top, 0, 0, s, CopyPixelOperation.SourceCopy);
    }

    return dest;
}
This function is used to capture part of screen where game window is being displayed. Aside from being rather slow, we will be unable to properly capture window contents when it is in a background. As we can see from profiling, CopyFromScreen is the bottleneck here.
Optimized C++ screen capture (~30 ms)
We can use C++ functions by simply putting them in the DLL and later on importing in C#.
BOOL _CaptureScreen(int left, int top, int right, int bottom, HBITMAP dest)
{
    HDC hdc = GetDC(NULL);
    if (!hdc)
        return FALSE;

    int width = right - left + 1;
    int height = bottom - top + 1;

    HDC sdc = CreateCompatibleDC(hdc);
    HGDIOBJ sdc_orig_select = SelectObject(sdc, dest);

    BOOL result = BitBlt(sdc, 0, 0, width, height, hdc, left, top, SRCCOPY);

    ReleaseDC(NULL, hdc);
    SelectObject(sdc, sdc_orig_select);
    DeleteDC(sdc);

    return result;
}
This time we are using already created bitmap and we need to do is to copy pixel data from screen device to bitmap object using temporary memory device. BitBlt is doing the heavy lifting here.
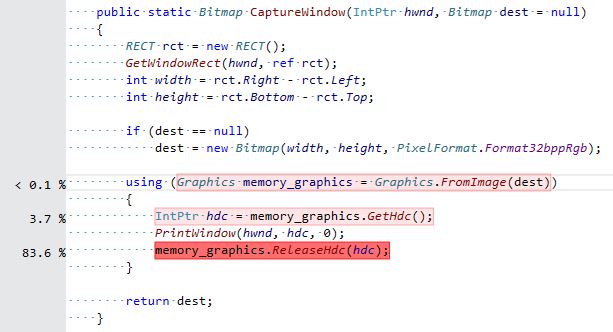
C# window capture (~19 ms - varies 15-23 ms)
Bitmap CaptureWindow(IntPtr hwnd, Bitmap dest = null)
{
    RECT rct = new RECT();
    GetWindowRect(hwnd, ref rct);
    int width = rct.Right - rct.Left;
    int height = rct.Bottom - rct.Top;

    if (dest == null)
        dest = new Bitmap(width, height, PixelFormat.Format32bppRgb);

    using (Graphics memory_graphics = Graphics.FromImage(dest))
    {
        IntPtr hdc = memory_graphics.GetHdc();
        PrintWindow(hwnd, hdc, 0);
        memory_graphics.ReleaseHdc(hdc);
    }

    return dest;
}
Profiling is showing that most of the time is spent inside ReleaseHdc. I assume that this is where data from temporary GDI bitmap is being copied to dest bitmap. We will try to fix this by moving code to C++ and skipping some unnecessary operations. However there is a problem on a horizon...
Optimized C++ window capture (~2 ms)
BOOL _CaptureWindow(HWND hwnd, HBITMAP dest)
{
    HDC hdc = GetDC(NULL);
    if (!hdc)
        return false;

    HDC sdc = CreateCompatibleDC(hdc);
    HGDIOBJ sdc_orig_select = SelectObject(sdc, dest);

    BOOL result = PrintWindow(hwnd, sdc, 0);

    ReleaseDC(NULL, hdc);
    SelectObject(sdc, sdc_orig_select);
    DeleteDC(sdc);

    return result;
}
There is one problem and one inconvenience with this implementation. The inconvenience is related to the fact that as we are passing HBITAMP around. Original C# bitmap contents won't be updated, because we operate on a separate GDI object created from original bitmap (Bitmap.GetHbitmap). The problem is that is may or may not work for DirectX applications depending on Windows version. For example, on Windows 7 it worked just fine for my test application (using DirectX) while it resulted in black images for Dead by Daylight. When tested on Windows 10 it worked perfectly in all cases. I won't go deep into the rabbit hole, but the bottom line is that whenever it will work or not depends on how PrintWindow was implemented in given Windows and how application is handling WM_PAINT message. You can read more on the net (been there done that, here is one interesting discussion on stackoverflow). Sadly, for Dead by Daylight on Windows 7 we have to use second solution (partial screen capture using BitBlt).
Other solutions
There are other solutions which I'm aware of but not implemented myself:
- getting backbuffer from DirectX application (most probably requires hook in rending loop before Present)
- display duplication API (introduced in Windows 8, allowing to capture screen using DirectX)
Since I got really fast solution for Windows 8+ anyway and decent solution for any Windows, I decided to stop my investigation here.
Supporting Hex: Ruin
This is one tricky little bastard. By simply inverting colors of the skill check, devs managed to screw my simple algorithm for detecting progress and success zone. It will decide that progress is already far behind success zone and press Space immediately, failing a skill check.
Fortunately I came up with simple fix for that. What I did is "exploiting" the fact that progress "line" is reaching further outside the circle. So I'm looking for a progress a little bit outside of the skill check circle, while looking for a success zone on an actual circle. Now I don't really care what are the colors of progress and success zone are. It will work even when both are white.
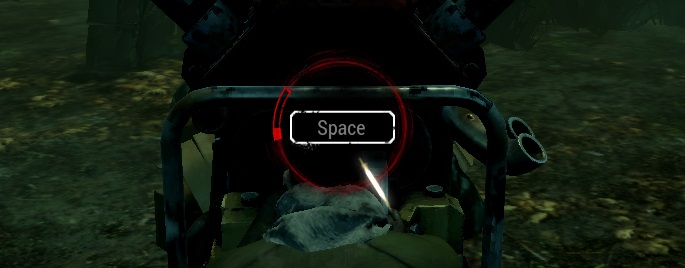
Supporting random skill check location
Another issue was that skill check may appear at random location and shake when killer is using "Order" - Class I addon. Here is what I'm talking about.
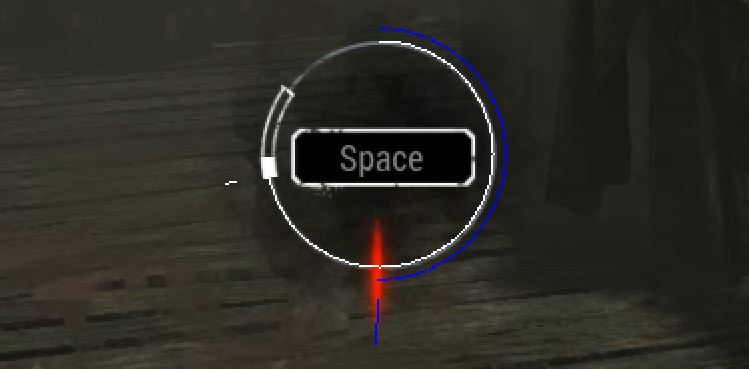
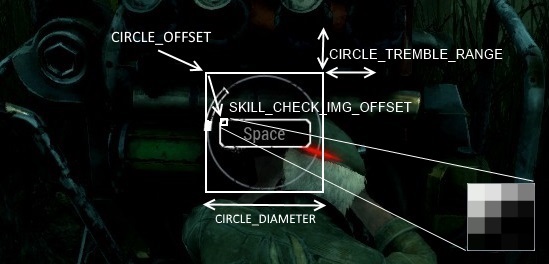
To support that we need to be able to locate skill check on the screen. And do it fast. Fortunately we can use non transparent "SPACE" element being displayed along with a skill check. We will try to find it using small 4x4 pixels image search and translate resulting x an y coords to figure out CIRCLE_OFFSET. Image search on a large area is pretty costly operation so we don't want to perform full search every time.
First we can verify if skill check is at its previous location. If it's not then we check "tremble" proximity (for these shaking skill checks). Last resort is looking for it in area where is can randomly spawn. When we have a regular skill check in progress we are looking at <1 ms computation time as we will always find it at its previous location. Worst case scenario (when there is no active skill check) will take ~12 ms. Here is optimized version.
int x = 0; int y = 0;

if (AutoIt.ImageSearchArea(skill_check_bmp_hbitmap, 0, (int)(Program.CIRCLE_OFFSET.X + SKILL_CHECK_IMG_OFFSET.X), (int)(Program.CIRCLE_OFFSET.Y + SKILL_CHECK_IMG_OFFSET.Y), (int)Program.CIRCLE_OFFSET.X + Program.CIRCLE_DIAMETER, (int)Program.CIRCLE_OFFSET.Y + Program.CIRCLE_DIAMETER, ref x, ref y, 35, screen_hbitmap) ||
    AutoIt.ImageSearchArea(skill_check_bmp_hbitmap, 0, (int)(Program.CIRCLE_OFFSET.X + SKILL_CHECK_IMG_OFFSET.X - CIRCLE_TREMBLE_RANGE), (int)(Program.CIRCLE_OFFSET.Y + SKILL_CHECK_IMG_OFFSET.Y - CIRCLE_TREMBLE_RANGE), (int)Program.CIRCLE_OFFSET.X + Program.CIRCLE_DIAMETER, (int)Program.CIRCLE_OFFSET.Y + Program.CIRCLE_DIAMETER, ref x, ref y, 35, screen_hbitmap) ||
    AutoIt.ImageSearchArea(skill_check_bmp_hbitmap, 0, SKILL_CHECK_RECT.Left, SKILL_CHECK_RECT.Top, SKILL_CHECK_RECT.Right, SKILL_CHECK_RECT.Bottom, ref x, ref y, 35, screen_hbitmap))
{
    CIRCLE_OFFSET.X = x - SKILL_CHECK_IMG_OFFSET.X;
    CIRCLE_OFFSET.Y = y - SKILL_CHECK_IMG_OFFSET.Y;

    //...
}
Summary
It took a while, but in the end we managed to achieve our ultimate goal of hitting perfect skill checks 99% of the time. Here is final helper in action.
The green number above screen capture duration is showing fixed correction value. I can adjust that at run time with +/- keys.